
Interested in learning how to make stained glass art, but don’t know where to start? If you’re into learning at your own pace with step-by-step instructions, you’ve come to the right place.
If learning in person is more your style, there may be a local stained glass studio in your area that offers classes. There’s more than one way to learn this craft and everyone learns differently. If a step-by-step process is all you need, then let’s get into it.
In this article we’ll cover how to make copper foiled stained glass, also known as the “Tiffany Method.” This method of creating stained glass is great for beginners, for hobby-style pieces, and for very intricate stained glass pieces.
Before you can begin creating anything you’ll need to purchase all the required supplies. You can purchase a beginner start up kit, or you can gather your supplies individually. I break down the cost of each here. You can also download this free supplies checklist to keep track of your purchases.
*Heads up: TGC is reader-supported and this page may include affiliate links. If you click and purchase, I may receive a small commission at no extra cost to you. As an Amazon Affiliate I earn from qualifying purchases. You can read my full disclosure here.
Step One: Prepare Your Stained Glass Pattern
When making stained glass, you have a couple options when it comes to finding patterns. You can find some great free patterns online by searching “free stained glass patterns.” There are also a lot of great and very affordable patterns on Etsy, or you can download some of the patterns right here on TGC.
Another option is to draw your own. I cover more on this in How to Draw a Stained Glass Pattern.
If you’re a Cowboys fan and you’d like to create the same pattern shown throughout this article, you can purchase the pattern here.
Depending on how you transfer your pattern, you may need to have two copies printed.
Step Two: Transfer Your Stained Glass Pattern Onto Your Glass
Once you have your pattern in hand, it’s time to get that pattern onto the glass. You can cut and stick-glue your pattern pieces directly to your glass, or trace the pattern onto the glass with a permanent marker.
There’s a few different ways to transfer your pattern. I suggest using all of them at some point, that way you’ll find which method you like best.

A couple things to remember when transferring your pattern onto your glass:
- Wherever you cut, that line will need to be a continuous break. If you place pattern pieces in the way of your score line, the glass will break and you’ll need to re-trace or glue down a new pattern piece. Imagine each score line while you’re placing your pattern pieces.
- If your glass is textured, you always want to cut the smooth side. If you’re wanting your texture on the front be sure to glue down or trace your pattern pieces upside down.
Step Three: Cut Your Glass
Now that you have all your pattern pieces onto your glass, it’s time to cut the glass.
With your glass cutter wheel placed at the beginning of where you want your cut to be, score the glass by gently but firmly gliding your glass cutter from edge to edge. Some tips to keep in mind:
- You may or may not hear a pleasant “zipping” sound. This depends on the glass and if you’re applying the right amount of pressure.
- Cut from EDGE TO EDGE. Never start a score line in the middle of the glass, and never stop your score line in the middle of the glass.
- You can cut curves in glass, but not sharp angles.
- NO RE-CUTS! Take your time placing your cutter and mapping out where your score line will go, and follow through.
Once you have a score line going from one edge of the glass to the other, line up the marker on top of your running piers with your score line, and press firmly. This should break your glass at the score line.

Repeat using your glass cutter and running pliers on each piece until they are as cleaned up as you can get them with this tool.
You will find that in some cases where you have only a small bit of glass still left, your running plier won’t work. This is where your grozing pliers come in.
To use your grozing pliers you’re going to hold them (flat side up), place the tip of your pliers on the score line, and pull straight out. If this isn’t working, you can also “groze” away the glass bit by bit, by simply clamping your piers down onto the glass edge.

Step Four: Grind Down Rough Edges of Glass
Once all your glass pieces are roughly cut, it’s time to grind down the edges to a smooth finish. It’s important to have smooth, flat edges so that your copper foil fits over the glass evenly.
Depending on your budget, you may be using an abrasive stone or an electric glass grinder (my favorite grinder is the Inland Grinder.) For the sake of this article, we’ll cover only the grinder method.
DON’T FORGET YOUR SAFETY GLASSES! This is the part in the process where you are almost guaranteed to get glass in your eyes if you don’t wear the proper protection.
With your glass piece placed flat on the grinder service, turn your grinder on and smoothly move your glass piece back and forth until you grind down to your pattern line. The pressure you’ll need to apply will depend on how new your grinder bit is. If this is your very first time using the grinder, you won’t need to press hard!
It’s best to grind a little off at a time vs grinding too much and having to cut a new piece of glass. With this method you want your pieces to fit together as perfectly as possible.

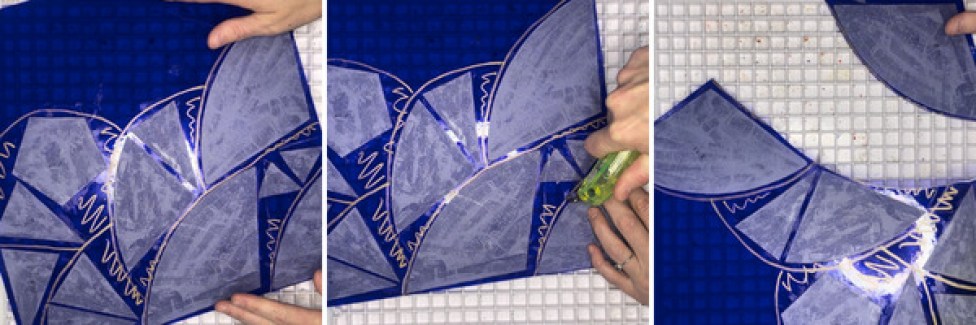
Step Five: Wrap Glass Pieces in Copper Foil
For this step you’ll need:
- Your copper foil tape
- Burnisher tool (or anything flat will work just fine)
- Scissors
- Xacto Knife
A popular way to assemble your piece (and the method I use) is to use the copper foil in all of your center, and then border your piece with lead came. This gives you the ability to design and assemble very intricate, detailed pieces, while also providing structural support and a cleaner border.
If you’re not using any lead came on your piece, you’ll simply wrap all sides of each piece of glass. For all the information on what size tape to use, the best brands, and pro tips, check out my Guide to Stained Glass Copper Foiling.
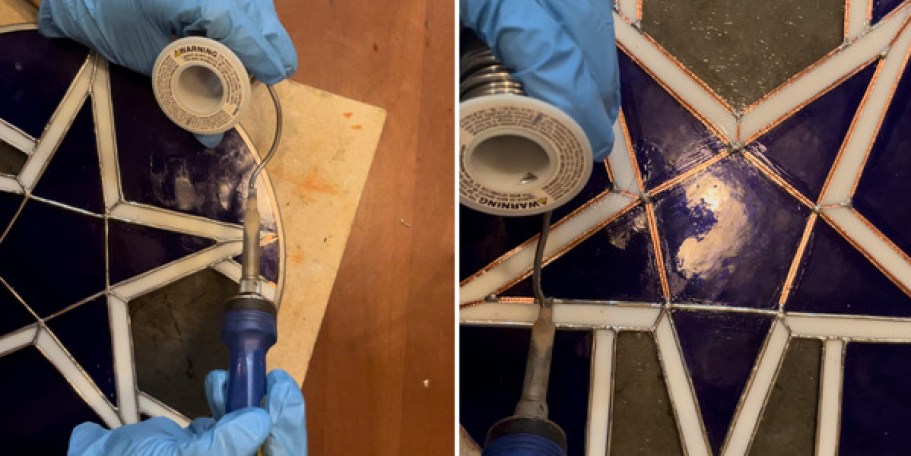
Step Six: Solder Your Glass Piece Together
With all your individual pieces of glass foiled, it’s time to prepare to solder. A full list of what you’ll need before you begin:
- Safety glasses
- Fume extractor or fume mask
- Soldering iron + soldering stand
- 60/40 solder (or lead free solder if you prefer)
- Liquid flux or gel flux (I recommend you try both at some point so you can choose which one you like the best)
- Flux brush
- Protective gloves
Lay all your copper foiled pieces down where they need to be. If you don’t have a work surface like a workbench that you don’t mind getting messy or burned, you can use a homasote board to protect your area.
You may want to secure your glass pieces in place so they don’t move while you apply your flux or solder. There are a few different ways you can do this. You can:
- Use painters tape on one side and flip your piece over
- Tack the edges of your piece with horseshoe nails or tacks depending on your work surface
Or you can not secure your pieces and just work very carefully so they don’t move. You will find the best way that works for you over time.
Once all your glass pieces are exactly where you want them, you can begin to solder:
- Start by applying flux to all the joints of your piece
- “Tack” each piece together where you’ve applied the flux

- Once all your pieces are tacked together, you can remove anything holding your piece together and begin applying flux to the rest of your piece. You don’t need a lot, just a thin layer over all your copper foil tape
- Hold your lead solder to your solder iron and begin to solder your whole piece
Some tips to creating clean solder lines:
- If you’re using the Hakko FX-601 Soldering Iron or something similar, I’ve found that it’s best to set the temperature between 360 and 410 degrees.
- Find a speed that lays down a good beaded line, and try to maintain that speed throughout the whole piece
- Pick up your solder when you’re about to go over a tacked piece of solder to avoid adding too much solder to your bead and flooding any corners
- Pick up your solder when you’re getting close to the edges, or before you’re wanting your solder line to stop
Step Seven: Finish Off Stained Glass Border
You have two options here. You can apply a lead came border, or you can simply tin and bead the edges. Tinning the edges is great when first starting out because it’s a skill you need to have as a stained glass artist.

Step Eight: Attach Jump Rings
With all your soldering supplies still out, it’s time to attach your jump rings. This is how you will hang your piece.
In addition to your other soldering supplies you’ll need:
Note: Not all metals can be soldered, therefore you will need to pay close attention when purchasing your jump rings.
If you’re using jump rings you don’t need to do anything except keep in mind that you’ll want to solder the opening of your jump rings DOWN against the end of your piece.
This step is a little tricky because you really need both hands. One to hold the jump ring in place with your needle nose pliers, and the other to solder. To help with this you can use something like these helping hands.
Another option is to apply the jump rings with the piece laying flat on the table.
However you choose to do it, once you have your jump rings held in place, you’ll need to apply solder to both the ring and the stained glass edge, and solder them together.
Note: You want to solder the joint of your jump rings facing down against the edge of your piece.

Step Nine: Wash Your Stained Glass Piece
For this step I simply take my piece to the sink, run it under warm water, and scrub it with Dawn dish soap using a regular scrub brush.
** MAKE SURE IT’S A SEPERATE BRUSH FROM WHAT YOU USE IN YOUR EVERYDAY USE. You don’t want to contaminate any brushes with all the hard chemicals and lead.
Step Ten: Patina (Optional)
With a completed piece, washed clean with soap and warm water, you may now add your patina of choice.
A quick rundown of the patina options: black patina turns your solder black, copper patina turns it copper, and if you don’t use any patina at all you’ll keep your glimmering silver solder.
To patina:
- WEAR GLOVES and make sure your area is well-ventilated or wear a fume mask.
- Lay your piece down on a flat surface (and ideally on a rag or shop towel)
- Get a container (or use your patina cap if you don’t need much) and poor some of your patina in
- With a toothbrush, or Qtip, or… really whatever works for you (I prefer an old toothbrush) apply an even, liberal amount of patina to your piece. Cover the piece entirely so that ALL your solder has been changed and matches. Including the sides
- Wash again with warm soapy water
Step Eleven: Attach Hanging Chain
Now that you have a completed stained glass piece, it’s time to attach your hanging chain! You have several options for the material you use as your chain. Some include:
- Metal chain
- Ribbon or string
- Leather or suede
- Rope
You get the idea… you have options. Just keep in mind that if your piece is rather heavy it may be best to stick to a metal, sturdy chain so that it doesn’t one day fall and break (at least not because of how it was made).
Step Twelve: Polish (optional)
You don’t HAVE to polish your piece. You may find that you like it just as is. However, in my opinion polish makes a world of difference in the final appearance. You solder lines will be so shiny and look so good!
If you do wish to polish, I recommend Clarity Finishing Stained Glass Compound. It’s the only thing I use and it works GREAT! Follow instructions on the back of whatever brand you decide to use.
And VOILA! You have your first stained glass piece complete!!!


Do u have classes?
Hi Shari! I don’t currently offer classes. This blog is my way of teaching. However, I will be including videos into my content in the future and am happy to answer any specific questions you have.
Pingback: Stained Glass as a Hobby (2024): Mastering the Art of Colorful Creations | HobbyFAQS