
Having trouble getting that tight fit for your stained glass pieces? Wondering what in the world are you doing wrong?
Don’t worry, we’ve all been there!
Like any part of the stained glass process, practice makes progress. However, even practice can’t rid you of some struggles. Experienced stained glass artists can and do still have issues fitting their pieces from time to time. The trick is knowing all the ways to try to avoid it, and how to fix it.
But how close should your stained glass pieces fit together?
When fabricating stained glass using the copper foil method, your pattern pieces should fit together as perfectly as possible to get the best results when soldering.
You may have seen or heard the rumor that gaps in your piece are good for a number of reasons. However, this is not true. For the best soldering results, avoid gaps as much as possible.
*Heads up: TGC is reader-supported and this page may include affiliate links. If you click and purchase, I may receive a small commission at no extra cost to you. As an Amazon Affiliate I earn from qualifying purchases. You can read my full disclosure here.
Issues Gaps Can Cause
Varying thickness in your solder lines. In order to achieve a clean and even solder line, you’ll want your pieces to fit together perfectly.
However… This is the real world and small gaps will happen. So let’s talk about it.
There are some cases where a slight variation in the thickness of your lines is fine. For example organic, flowy lines. Designs with organic shapes don’t show line variation as easily as geometric designs do. And thus – a little gap here and there isn’t going to ruin the look of your finished piece.
So what is “slight” or “little” or even just reasonable? Well, that really depends on you and your piece. As mentioned above if you’re fabricating a geometric piece you may have little to no room for any gaps at all. However, if you’re operating more loosely – here’s some photos of what I’ve experienced to be manageable size gaps… and why I was okay with keeping them.
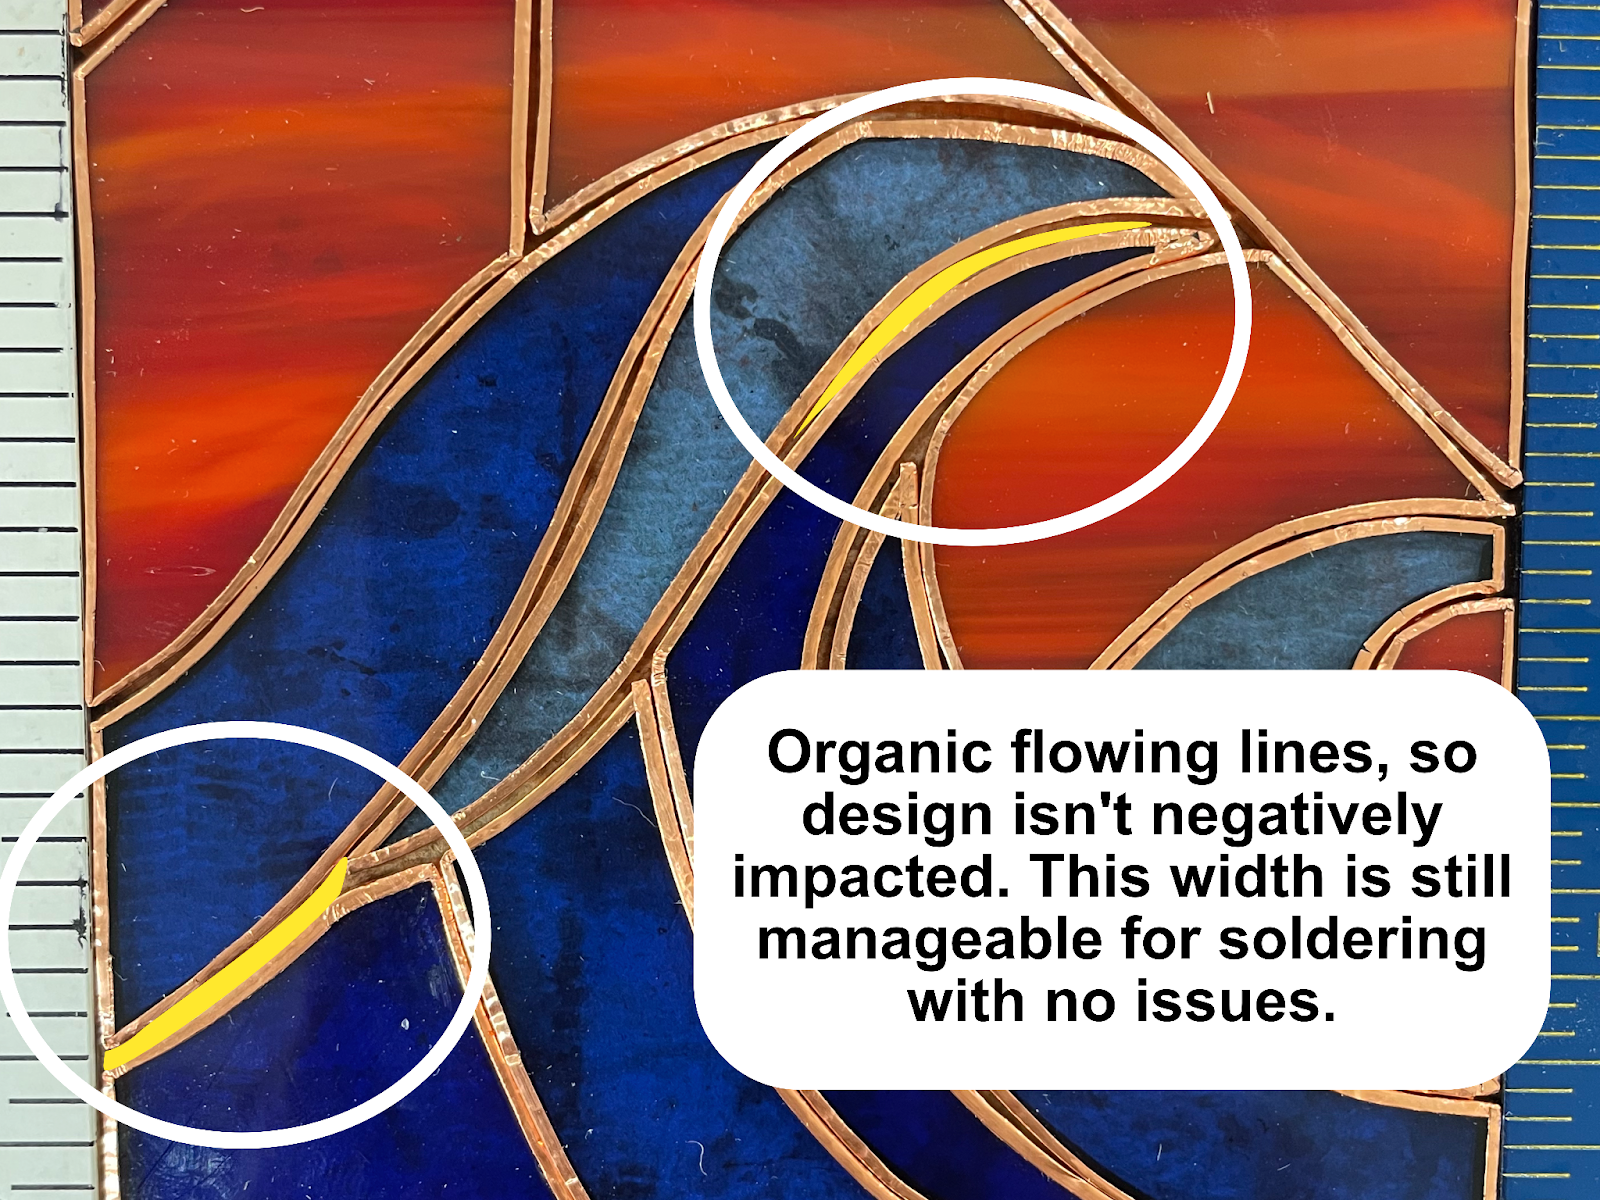

The last phone is about as large of a gap that I’m willing to keep. Anything larger and your line variation is very noticeable and you start to run into other issues. Like…
Rough, bumpy solder. When you have a large gap filled with solder, this can create air pockets when solder is melted over top. These air pockets can be difficult, and sometimes impossible to smooth out. Leaving a patch of rough, uneven solder.
Solder melting through to the other side. If all you’re soldering over is more solder, the heat is going to conduct and melt the solder underneath. This will cause the solder to melt straight through to the other side. Now not only do you have to build your solder back up, but you’ll have to remove the melted solder on the back side and re-solder that section.. Hopefully not doing the same thing again.
How Gaps Happen
Copper foil tape. It might not seem possible that something as thin as copper foil tape can make such a difference in how your glass pieces fit together, but if you are fabricating a complex design that is composed of many individual pieces – this can add up causing our pieces to fit differently than they did before you taped them.
Glass pieces shifting. Even the slightest shift in your pieces can cause the glass pieces around it to fit very differently.
Overgrinding. It’s easy to over grind a piece in order to make it fit, only to find at the end that you’ve grinded too much off and now have a large gap.
Now that we know how gaps can happen, and why they’re not ideal. Here are seven things that have helped me avoid and fix gaps in my stained glass pieces:
Tip One: Glue Pattern Pieces to Your Glass
There’s a few different techniques you can use to get your pattern onto your glass, and they’re all good if they work for you. However, if you keep encountering gaps it may help tremendously to glue your pattern pieces directly onto your glass vs using one of the tracing methods.
You can use standard printing paper, tracing paper, or even watercolor paper and glue it down with a stick glue.
I started out only using this method with very small, tedious pieces, but now it’s the only way I transfer my patterns. It takes a little more time in the beginning, and when it’s time to remove your pattern templates – but has saved me several hours on the grinder working to get the perfect fit, and creating new pieces to repair large gaps.
Tip Two: Use Layout Frames
The less your pieces can shift on you, the better. Some sort of layout guide is a great tool for keeping everything where it needs to be. If you’re building a square or rectangles piece you can tape down a L square and a ruler to make your own frame, or you can purchase something like the Adjustable layout block system.
If your piece isn’t square, there are also layout frames available that come in different shapes. The best selection and price I’ve found for these is actually through a stained glass artist in Florida, Erin Glassworks. She sells Shaped layout frames on her site.
Tip Three: Grind All Pieces Before Perfecting
If your process is to perfect each piece as you go and you keep having issues with gaps, consider grinding all your pieces before you begin perfecting the fit.
The reason this tip works is because, as we mentioned above, your pieces shift. Changes you make to one piece now may cause a miss somewhere else as you lay more pieces down.
If you’re working with very intricate designs that have several pieces, or small pieces, or several small pieces… you can group some pieces together as you go, but try to avoid making changes to every piece until they’re all ground down and laid out.
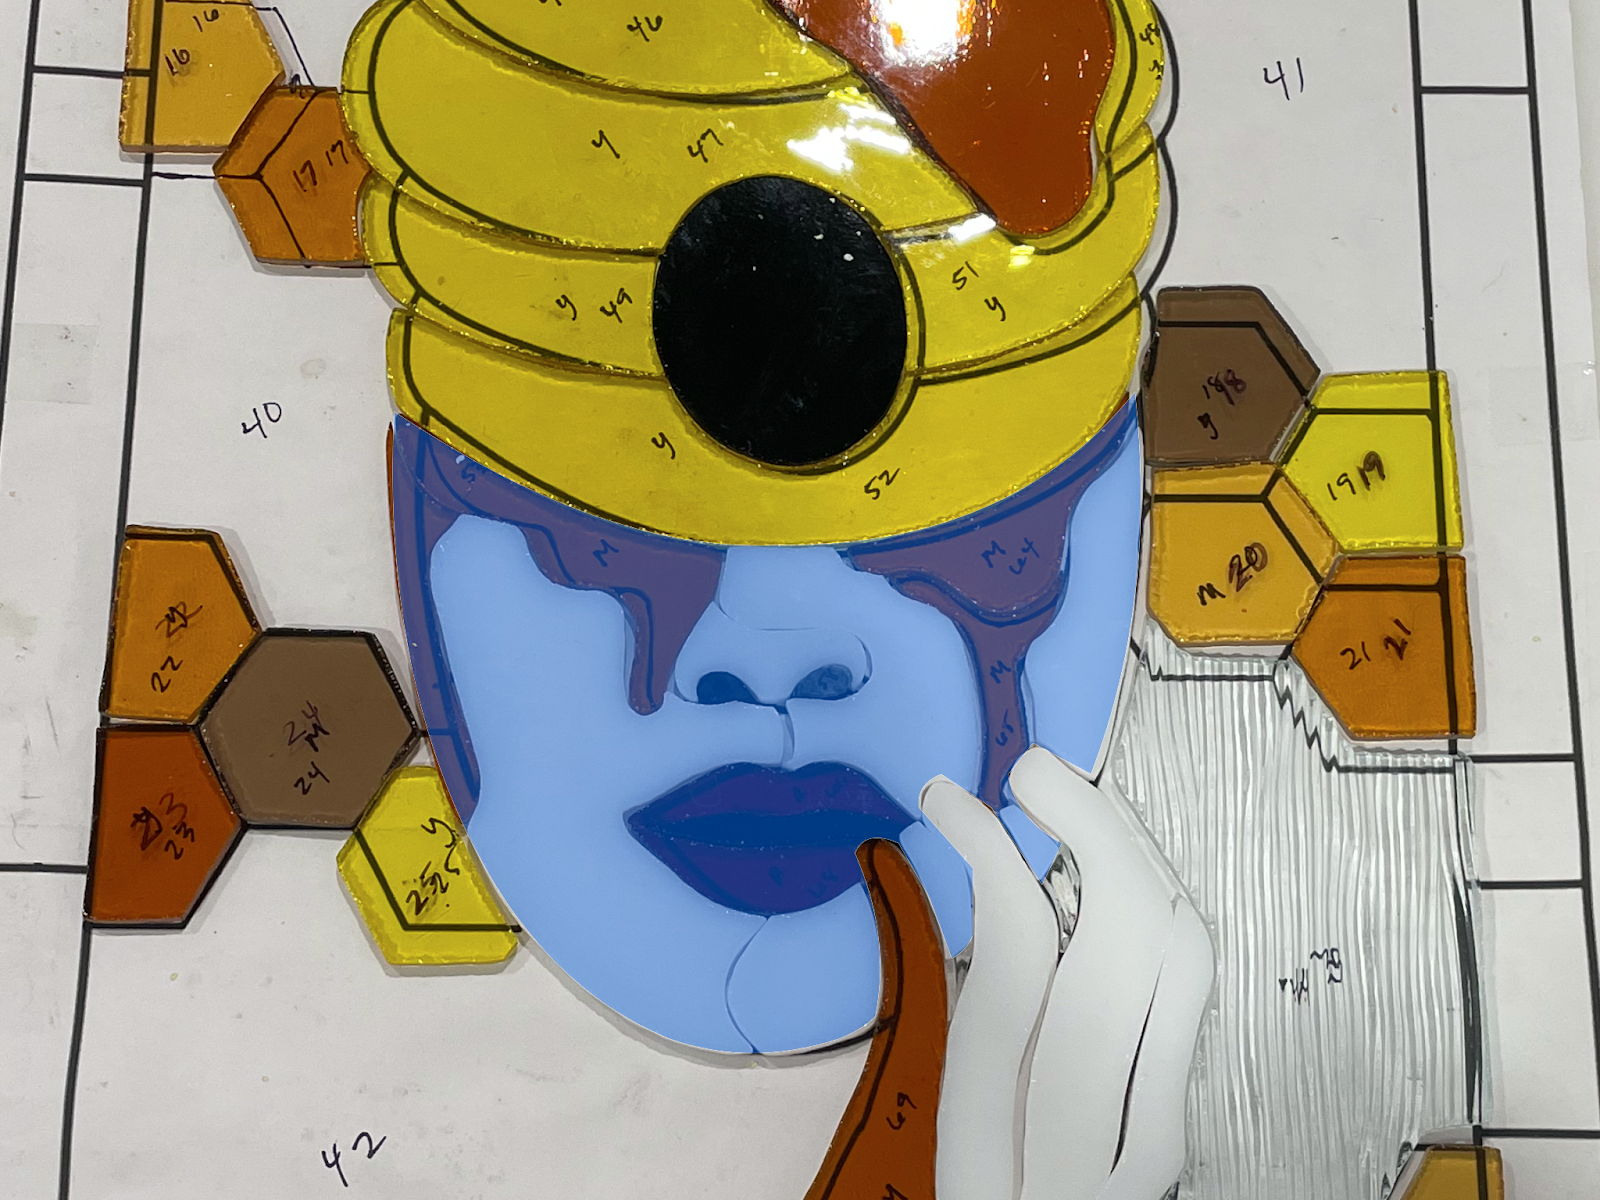
To show an example of this, here is one of my more complex pieces I finished a few weeks ago. This design has 77 pieces in total, some of which – like those in the face, were very small. For this I grouped the face together and perfected all those pieces as I went so that I could treat it as one large piece, then grinded all my other pieces before doing any more perfecting.
Tip Four: Study The Entire Piece Before Making Corrections
This sort of ties in with tip three, but can be a good rule to follow no matter your process. And again, this is especially helpful when you have a very intricate design with several pieces.
If you’re using a tool like layout blocks, it may be easier to detect where your mismatch is. However, if your pieces are shifting – even slightly as you’re fitting them together, check and recheck that things are lined up right in all areas and not just the immediate area with the gap.
The misalignment that’s causing your large gap might surprise you.
Tip Five: Are You Grinding The Right Side?
I phrase this tip as a question because you should be sure about where and how much glass you want to grind off before you start perfecting any of your pieces. This sounds like a no-brainer, but it isn’t always.
Have you ever looked at a piece, decided what and where you needed to take off, only to try to fit it again and saw that it didn’t help at all, or even made it worse?
This is because when pieces are laying next to each other, it’s difficult to see those little differences in the alignment, and easy to assume it’s something completely different.
Instead, try holding your glass piece slightly OVER the top of the glass it’s not fitting with. This is much easier if you’re working over a light box, but still possible if your work surface is a lighter color and your glass is transparent.
Tip Six: Keep Your Copper Foil in Mind
This one is a little tricky to explain, because you do want a tight fit before you tape. However, If you have two pieces of glass that are fitting SO PERFECTLY and the way they are fitting together, you just know that some foil is going to throw it off – trim a little off.
The best case I can think of for this is deep curves. If piece A is a deep curve and piece B fits perfectly into it – these are instances where a little wiggle is good before you apply your copper foil.
If you don’t, then when you do apply your foil it’s not going to sit correctly, and may end up affecting the piece next to piece B, and the piece next to that, and next to that.
Tip Seven: Replace The Glass
I know you don’t want to hear it, but at the end of the day the best way to fix the issue of gaps once you have them is to just replace that piece of glass.
If your gap is just slightly airing on the side of too big, you may be able to move it around and manipulate that gap so that it is divided up on either side – creating two or more smaller gaps instead of one large one. If this doesn’t or can’t work – it’s time to just replace it.
To replace it you’ll want to now use the shape of the gap you need to fill. Even if you suspect your piece doesn’t fit because it’s been grinded down too much, and replacing the original template piece will work – it’s always best to just go off your gap.
There are two ways you can trace out your empty space:
- Slide a piece of paper under your glass and trace the empty spot so you get the exact shape you need. This can be a pain because your pieces will move when you go to insert and remove the piece of paper, and you will need to align them back in place.
- If you’re working over a light table, remove the glass that needs to be resized and place a piece of paper over your piece. With a thin or regular sharpie marker (or anything that goes down easily and smoothly) gently trace out the shape you need.
Now that you have the exact shape you need to replace you can glue it down to your new piece of glass and fill that gap perfectly.
I hope you find these tips useful! If you ever have any questions or would like to leave feedback please feel free to comment. I’d love to hear from you!


