
I don’t know about you, but I’m always looking for ways to include stained glass in my home and this DIY stained glass night light is an easy way to add stained glass to any (and every ;)) room.
Night lights are a great DIY stained glass project because other than your usual supplies, there isn’t much else you need. If you’re brand new to stained glass and are unsure of what basic supplies you need, you should see my earlier post Supplies You Need to Make Stained Glass. I also cover all the basics of creating your first stained glass piece in How to Make Stained Glass Step-by-Step.
So – ready to make a stained glass night light with me? Let’s get into it 🙂
*Heads up: TGC is reader-supported and this page may include affiliate links. If you click and purchase, I may receive a small commission at no extra cost to you. As an Amazon Affiliate I earn from qualifying purchases. You can read my full disclosure here.
Additional Supplies You’ll Need:
- Night Light Kit – 6pck
- Needle nose pliers
Step 1: Prepare Your Stained Glass Pattern
Print out a stained glass night light pattern or draw one from scratch. If you’d like to use the same exact pattern that I used, you can print this free stained glass night light pattern.
**Please note, the butterfly night light pattern above includes two very small pattern pieces. You can modify it to remove the two bottom circle pieces if you have difficulties with them. It’ll still come out great 😉
You should have two patterns. One for using as your guide to shaping your glass pieces, and the other to refer to when building your finished piece. If you use the free printable I include above, it comes with two patterns on one sheet.
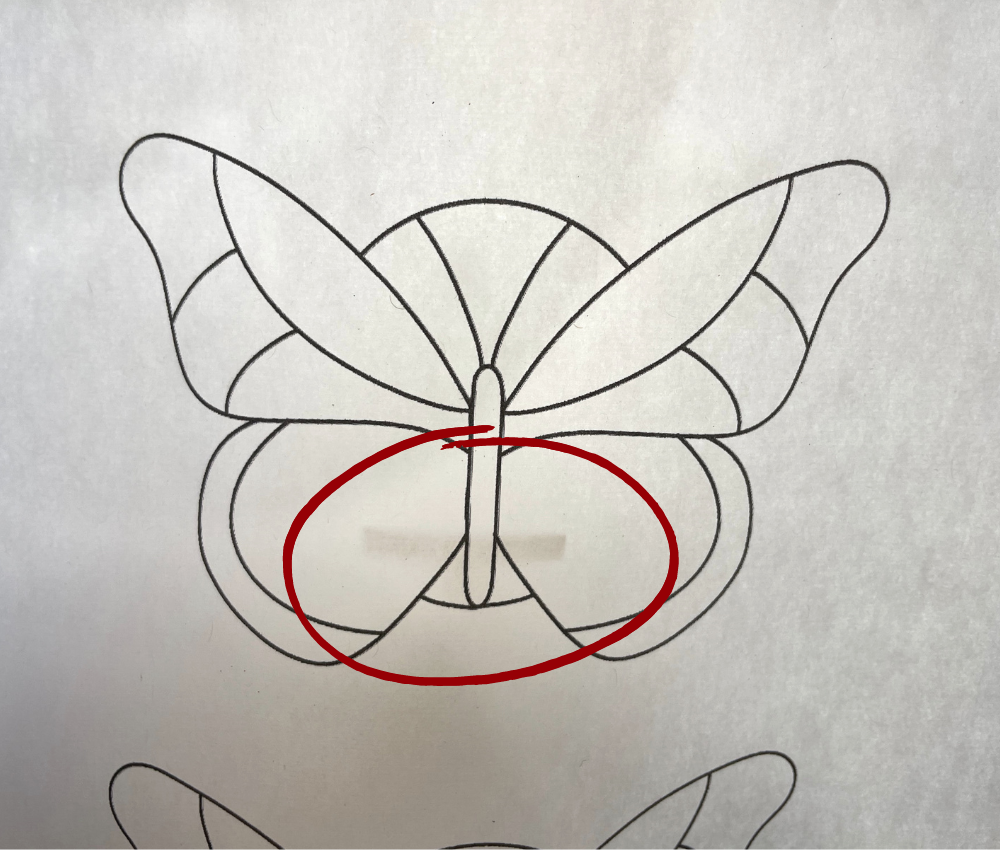
If you are creating your own stained glass pattern, you’ll want to be sure to include solder lines where you’ll want the base to go. This is because the base is soldered to your piece. That’s how it holds.
This is part of the reason I included the circle around the butterfly in my design. The thought was that all those lines would be a perfect place to solder the bracket, however I ended up going up a little on my butterfly anyway!

It’s also a good idea to hold the base up to your pattern with some light source behind so that you can get a good visual of where the light bulb will be behind your piece. For instance, maybe you don’t want a piece of clear glass here as you’ll be able to see the bulb. This is also a great way to gauge how large your night light will be, and exactly where the bracket will go.
After doing this, I actually ended up re-sizing my night light pattern to make it smaller. I felt the original size was a tad bit too large for what I wanted.
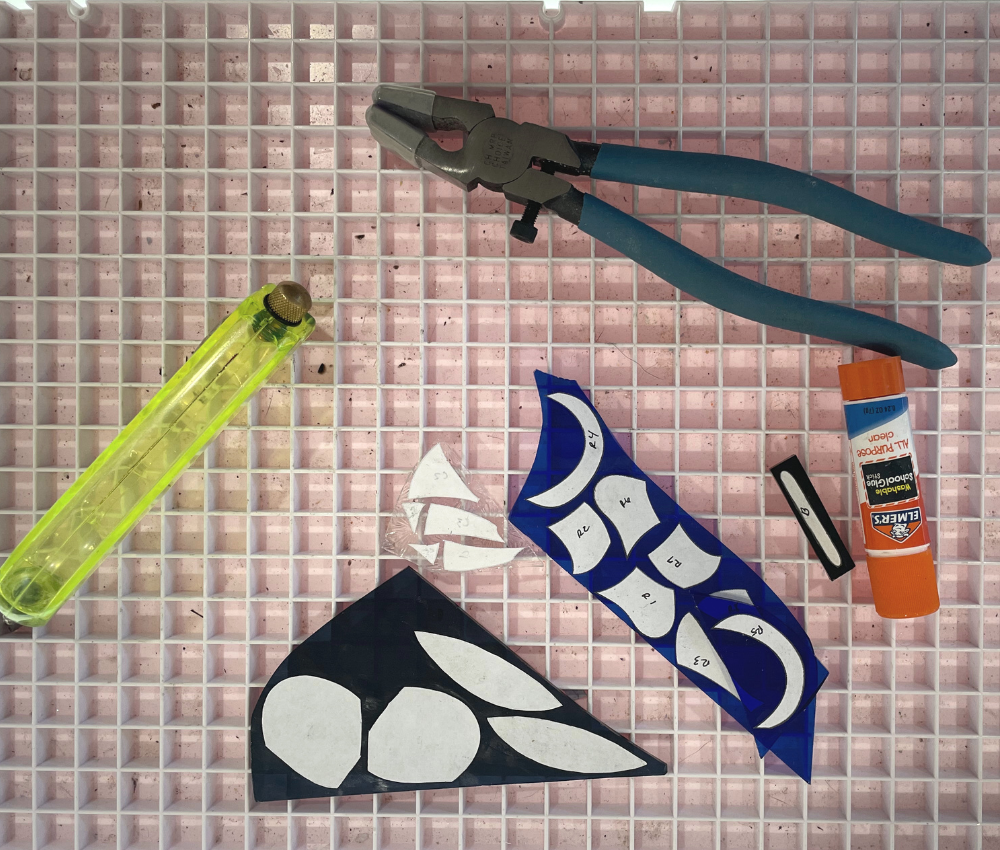
Step 2: Pick out Your Glass
Any glass you choose will work, but glass that sheds really good refractions is a great choice for nightlights. This way your nightlight will leave a pretty shed of colored light on the wall, counter, or floor. Antique glass or waterglass are really good options.
For my butterfly I chose two shades of blue and decided to use this clear glass I’ve had forever that has little flowers imprinted on it. I thought that’d be cute since butterflies land on flowers.
Step 3: Get Your Pattern Onto The Glass
If you’ve read my post on how to make stained glass then you already know there are a few different ways in which you can transfer your pattern to your glass. You can:
- Trace your cut out pattern pieces onto the glass with permanent marker
- Use Elmers stick glue to glue your pattern pieces onto your glass
- Trace your uncut pattern onto glass using light table and permanent marker
I use different methods at different times depending on mainly the size of the piece I’m creating, and more importantly the sizes of the individual pattern pieces that I’m working with. For small pattern pieces, I find it’s easiest to glue my cut out pattern onto the glass. This way, when I’m grinding all the water and my hands don’t rub the marker off.
I should also add that there’s different TYPES of paper you can use to glue onto your glass. You can use typical printer paper, tracing paper, or watercolor paper.

Once you have your pattern all cut, use the Elmers stick glue and glue your pattern pieces onto the glass you wish to use for those pieces. Since you’re using copper foil tape, there’s no need to cut away your pattern lines. You can just cut in the middle of the black lines. If you were using lead came on the other hand, you would want to make space for that lead came between your pattern pieces.
Keep in mind your score lines when placing your pattern pieces down. You don’t want to place any pieces in the way of where your glass will break!
IMPORTANT: If you’re using textured glass, you’ll want to glue your pattern pieces backwards so that you can keep the right shape, but cut on the smooth size of your glass.
Note: If your design includes multiple pieces that look similar to each other, it may be wise to number your pieces before putting them onto your glass. This way when you go to assemble you know exactly where each piece goes. You’ll want to number your other, not cut, pattern to match as well.
Step 4: Cut Out Your Glass Pieces
Now that you have all your pattern pieces onto your glass, it’s time to get your googles, gloves, glass cutter, and pliers. Let’s cut some glass!
With your glass cutter wheel placed firmly (but not too firmly) at the beginning of where you want your score line to be, gently but firmly glide your glass cutter from EDGE TO EDGE. You may or may not hear a pleasant “zipping” sound, it depends on the glass. However, most glass will make this noise if you’re cutting with the right pressure.
Cut out all your individual pieces best you can, and use your nipping pliers to clean up those edges so you can spend less time on the grinder!
Step 5: Grind Your Glass Pieces
This is where it can get a little tricky working with such small pieces of glass. If you’re experienced in working with pattern pieces this small, then you know how difficult it is your first few times. However, it’s all the same. Same process, same everything. Just a little bit trickier!
A couple tips I have for grinding small pieces of glass:
- Consider using vaseline on the outer edges of your glued down pattern. This helps keep the water from getting under the pattern piece and lifting it off completely. Likewise, if you decide to use a marker for your pattern outline (I personally don’t recommend for pieces this small), the vaseline will help keep the marker on.

- If you’re creating my butterfly pattern I’ve included, then you are NOT going to be able to lay some of these small pieces down flat on the grinder. OH NO! This is by far the worst part about working with very small pieces, but I promise you it’s still doable! You’ll have to instead hold the piece firmly with both hands while you grind. Making sure that it is flat the entire time so you still have an even, smooth edge.
Once you’ve grinded down all your pieces, check the fit. You may need to do some slight adjustments, but if you glued down your pattern pieces, you shouldn’t need a whole lot.
Step 6: Rinse Your Glass Pieces
This step isn’t necessary if you chose to use a permanent marker. If you did use the Elmers glue method, this is when you’ll want to remove the paper pieces and rinse that sticky glue film from your glass.
With your glass pieces laying flat and in their right place for assembly (so you know where they go after washing off the pattern piece), pick up one piece of glass at a time, rinse off the pattern piece with warm water, and place back.
When you have completely washed off all pattern pieces, you should have clean, perfectly fitted glass ready for copper tape!

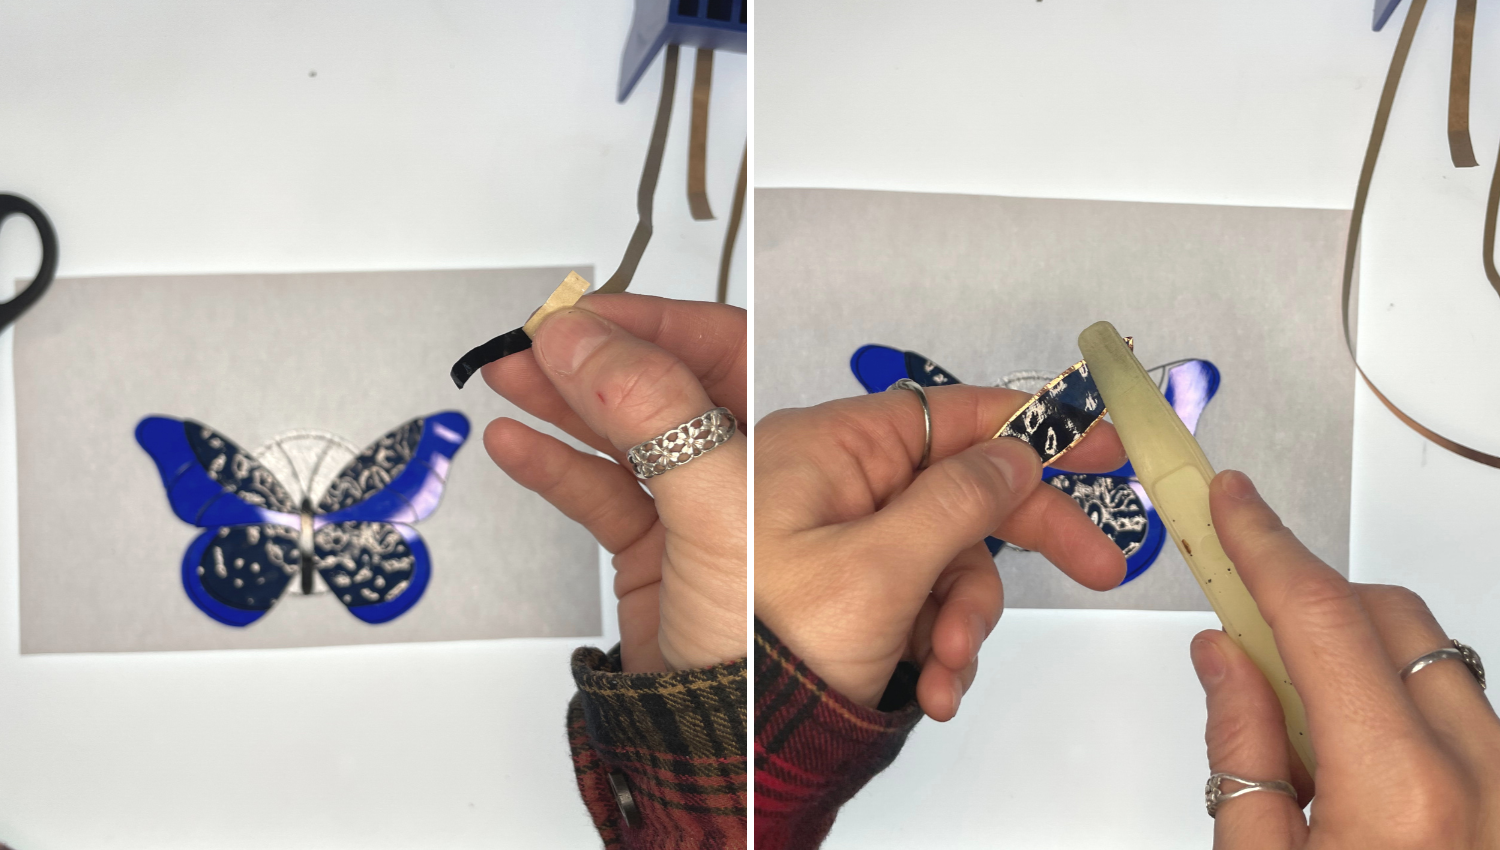
Step 7: Copper Foil Tape
As you may or may not already know, you have a few different choices when picking out the copper foil you use. This is dependent on the size of your copper foil, and the backing color.
Your backing color should match the solder finish you plan to have. I planned on using black patina on my butterfly, so I chose a foil tape with a black backing. This is so when the light is showing through the glass, you won’t see silver or copper. It will still appear as one cohesive line, even though sometimes what you’re seeing is actually inside of the copper tape.
For size I went with the 3/16″ copper foil which is a smaller tape. Since the night light overall is so small, and the pieces in the night light are small, I didn’t want to over power it with really thick solder lines.
With your copper foil picked out, it’s time to begin foiling.
While your clean, dry glass pieces are laying all fit together, pick one glass piece up at a time and foil around every edge.
Once your foil is on, use your finger to press flat against the side of the glass, and then use your varnishing tool (a sharpie cap works just fine) to smooth out the sides so they are smooth and tight.
If you notice any overlapping in your copper foil, this is where an Xacto Knife comes in handy. With your knife simply cut away any pieces that are sticking out. You can shape it so the line will appear continuous. The main thing is you don’t want a jagged solder line.
Step 8: Solder
Typically I don’t do anything to hold my glass pieces in place before I solder, and I didn’t with this piece. However, it was a little difficult not moving around such small pieces when applying the flux.
To help with this you can:
- Use horseshoe nails to hold your glass pieces in place (this may be a little awkward though since the horseshoe nails are so large.
- Use tacks to hold your pieces in place.
(if using a homasote board or something similar)
- Tape your glass piece together with blue painters tape and flip over to solder (this is probably the best option for this particular glass piece.)
Once your pieces are securely in place, add your flux and begin to solder 🙂
If you are using the Free Butterfly Night Light Pattern, you may have some gaps like the ones shown here:
No worries! 🙂 Simply build up your solder and it will fill in those spaces.
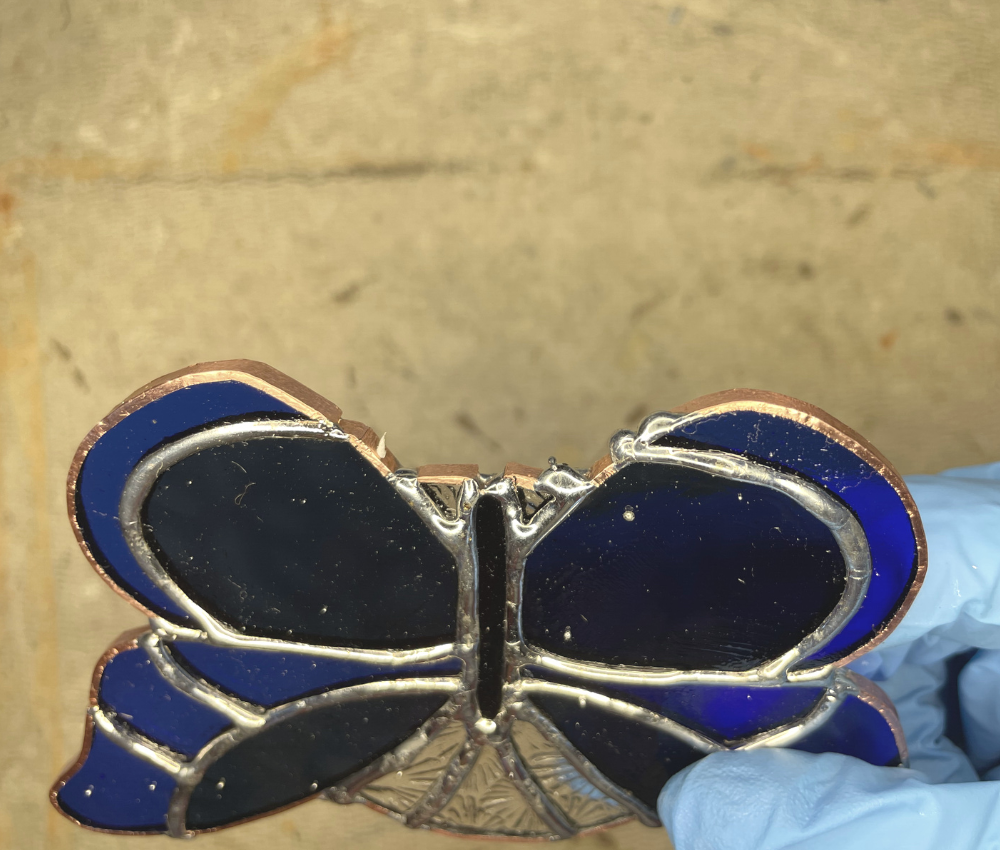
Since this piece is so small, I chose to bead my edges vs using U lead came for the border. To do this:
- Tin all the foil around the outside of your piece by first applying flux and then using a small amount of solder to coat all the foil in solder
- Once all the edges are coated and silver, begin beading your edges and building up the solder so you have a nice, thick edge around your night light

Step 9: Solder Bracket to Glass
Once Your entire piece is soldered and as a nice beaded edge, it’s time to solder the bracket to the back. If you purchased the Night Light Kit – 6pck the bracket and the hardware to attach it should be bagged separately.
I actually decided to use my lead nippers to trim the edges of my bracket down since it will be visible behind the glass where I’m positioning it. To do this simply place your nippers where you’d like to cut, and snip the end off. If you have extra bracket hanging off that isn’t going to be soldered to anything, it’s totally fine to trim this down if you’d like. However, this step is not necessary.

Really, I could have even clipped little triangle corner edge that’s peaking out behind my solder lines.
Once you’re bracket is just how you want it, it’s time to solder it to the back of your piece.
Apply your flux of choice liberally to the bracket, front and back, and to your night light where you’ll be soldering, and begin to solder. Don’t forget to watch for your glass texture. If you want this in the front, be sure to sold the bracket to the right side of your stained glass.
- Reel your solder out so that it’s sticking straight in the air. This will allow you to gather solder onto your iron without holding the solder.
- With one hand hold the bracket to your piece where you wish to solder (be careful – as you solder the bracket will heat up and can burn you. Gloves are a good idea for this step! (I should be wearing gloves, but we’ll just pretend like I am lol)
- With the other hand, lay down the solder where the bracket and your solder lines meet with your iron
All you really need is a good tack on the edges of your bracket, but you see below where I covered mine with a layer of solder. This is because I didn’t want the gold bracket standing out against the black patina. This won’t effect how the night light looks when it’s on, so this is entirely up to you.

Step 10: Remove Flux
To remove your flux you can use something like kwik clean, or simply wash it in warm soapy water. Personally, I only use the Kwik clean when I have a little bit of solder or patina to remove. For this step I washed my whole piece under warm water and dawn dish soap, and gave it a good scrub with a scrub brush.
Step 12: Patina (optional)
If you wish to have copper or black solder lines on your night light, this is when you should patina your whole piece. Front and back and all around.
I use an old toothbrush, liberally apply my patina and scrub.
Once all your solder lines are covered in patina and the desired color, you can use the kwik clean to remove your patina, or take it back for another bath.
Step 13: Attach Piece to Night Light Base
After you’ve removed all the patina and your piece is squeaky clean, you’re ready to grab your needle nose pliers and attach your stained glass to the base.
- Snap your piece around the base of the night light
- With one hand, use the needle nose pliers to pinch the bracket together
- With the other hand, slide the small screw through both holes
Once the screw is through, I find it’s easiest to hold the big end of the screw down with the needle nose pliers (while still pinking the bracket together) and then screwing the tiny nut on as tight as I can get it.
Note: Sorry these pictures are so horrible, I wasn’t paying attention to my camera placement OBVIOUSLY lol

Lastly all you need to do is screw in your light bulb and you’re done! I ended up completing two of these because I gave the first one away as a gift. I posted to my SM me making both, and both times got requests for them from people. I don’t have the time to make more right now, but I definitely plan to add more patterns to the site for other night lights 🙂 Let me know if you have any pattern requests <3


