
To add to the growing list of things you can make with stained glass, today we’ll cover how to make a stained glass candle holder.
I love any stained glass projects that are meant to hold fire light, because the way the glass illuminates and transforms with a flame is so.dang.pretty! And what’s best about this particular project is that it’s easy, doesn’t take a ton of material, and you can set up multiples of them around the house.
For this DIY project, you won’t need any tools or materials in addition to your stained glass supplies.
If you’d like to make the same candle holder I’m creating, you can purchase it from my artist collection of hobby license patterns on Etsy.
*Heads up: This page may include affiliate links. If you click and purchase, I may receive a small commission at no extra cost to you. As an Amazon Affiliate I earn from qualifying purchases. You can read my full disclosure here. Thank you for your support <3
Step One: Pick out Your Glass
Once you have your pattern in-hand, it’s time to start choosing what glass you want to use. Keep in mind, depending on how you are transferring your pattern to your glass, you may need two copies of your pattern.
Picking out your glass is so much fun! What color palette will you go with?
In my piece I went with purple and beige, and used a mirror for my bottom piece. You don’t have to use mirrored glass if you don’t have any handy, but these candle holders do look really good with mirrored glass here. It also will reflect the light of the candle.
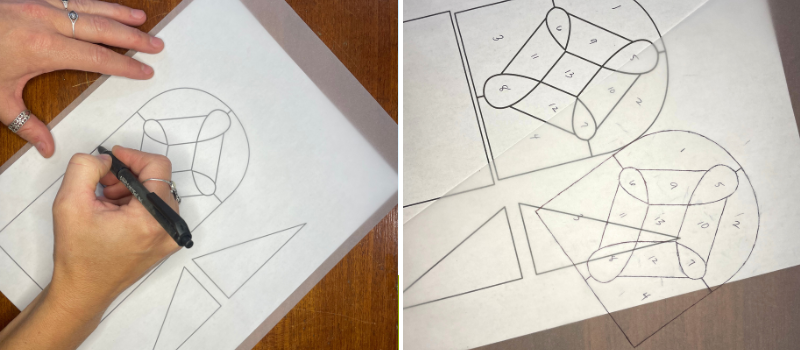
Step Two: Transfer Pattern to Glass
My favorite way to transfer patterns is to cut and glue the pattern to the glass. However, there are a few different methods.
Whichever method you decide to use, at this time you’ll want to get your pattern onto your front design, side pieces, and bottom piece.
Step Three: Cut Glass
With all your pattern pieces transferred onto your glass, it’s time to get out your safety glasses, cut resistant gloves, glass cutter, and a waffle grid if you need to protect your area.
Cut out all your shapes as close as you can get to your pattern edge or sharpie lines.
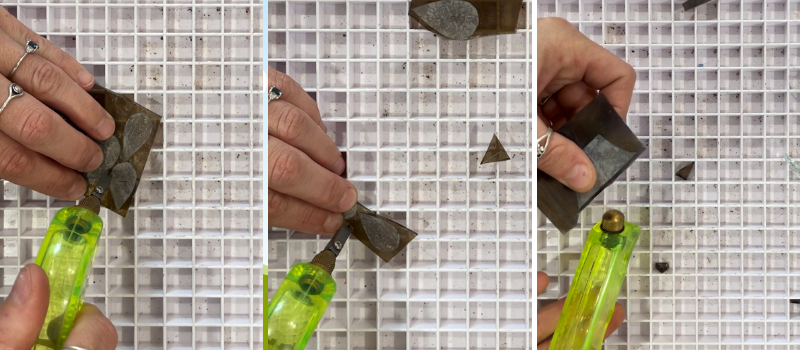
The closer you can get to your pattern shapes, the less time you’ll have to spend on the grinder.
Step Four: Grind Glass
With all your pieces cut as best you can, it’s time to grind them down to perfection. If you don’t have a grinder you can also use an abrasive stone, it will just take more time.
Cutting & Grinding Mirrored Glass
If you’re using mirrored glass for your base, here’s some cutting and grinding tips:
- Cut the mirrored side of the glass
- Tape your edges with blue painters tape to protect them while grinding
- Don’t push too hard while grinding. You want to be a little more gentle so as not to chip the bottom side of the glass.
After grinding you’ll notice some small chips on your mirror edges, and that’s OK. What you don’t want is really big chips that won’t be covered by your copper foil tape.

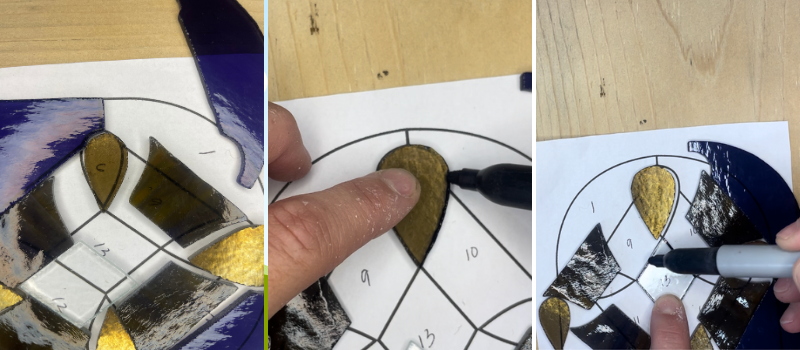
Step Five: Shape Up
Once you’ve grinded all your stained glass pieces down to perfection, they may still not be perfect.
Place all the ground down pieces over your printed pattern and see where, if any, you need to trim some glass off.
Your pieces should fit together as perfectly as possible. If your pattern grows a little this is normally OK, however in this case we really want it to be inside the pattern lines. This is because the base of our front pattern needs to be the same size as our bottom.
To trim your pieces, simply lay them over your pattern and use a sharpie permanent marker to color in the area you need to trim off. Take your piece of glass to your grinder, trim, and repeat until all your pieces fit perfectly.
Step Six: Foil Glass
We’re going to focus on soldering our front design first, but here you will go ahead and foil all of your pieces, including your sides and bottom.
For my front project I decided to border it with hobby came, so I left my outermost edges unfoiled. You can copper foil all of your edges even if you do use lead came, however since this piece is so small I’m using 5/64” which means I’ll definitely need to trim all my copper tape, and that it may show even after I trim it. With this small came, it’s really best to just skip your outside edges while foiling.

For my front design I used 3/16” copper foil since this is a smaller design and I don’t want it taken over with solder lines. However, for the edges of my bottom mirror and two triangle sides I used 7/32” tape. This is because I want a good soldered edge on these pieces. If you’re not sure what size or type of copper foil to use, I cover all the bases in my Guide to Stained Glass Copper Foiling. I also have a free cheat sheet that visually shows the common copper foil sizes and how they differ from one another.
Step Seven: Solder Front Design
With your front design laid out and ready to solder, hold your pieces in place however you like. You can use push pins if you’re using something like a homasote board or tape the front of your design with painters tape and then flip over. OR you can do like me, just carefully apply your flux and not worry about trying to secure it first.
Start by applying flux to your joints and tacking them together with beads of solder.
Once your piece is all tacked and you can move it around freely, apply your flux to the rest of your piece and begin soldering the rest.

I soldered my droplet shapes first so that all I had to do was attach my lines.
Once you’ve completely soldered the front (or back if you used tape) flip it over and solder the other side.
Keep in mind to not solder too close to your edges if you plan to attach hobby came to your border.
If you’re NOT using hobby came for your border, solder all the way up to your edges and finish by tining all the edges of your front design.
Applying Hobby Came Border
To apply hobby came, you’ll want to first cut it to size. I pull my came out and loosely border my piece with it to see how much I will need. I go over just a tad bit since the ends will get crimped by my pliers and vice.
Once cut, you want to stretch the came to get any kinks out. I use a lead came vice, but if you don’t have one of those you can simply clamp either end of your came with pliers and pull. This is easiest if you’re positioned on the floor and use your knees to help your arms pull the came apart.
With your stretched came, wrap it around your piece. Using your lead nippers, cut the came where it meets the bottom of the arch. This way you should have two pieces of lead came. One for the arch, and another piece for the bottom edge.
Now that you have two pieces of hobby came, you can begin attaching your border:
- Roll out your lead came so that there’s a long piece standing up that you can touch your iron with – this way you can solder with one hand.
- Take the longer piece of came, the piece that goes over your arch, and hold it firmly in place with the end even with the glass end.
- While the came is held firmly in place, apply a small amount of flux where your solder will connect to the came. Be sure to apply flux to both the tape and the lead came.
- Apply solder to connect the hobby came to your piece.
- Repeat until all connection points are soldered.
To connect your bottom piece, simply line it up with either edge, hold it in place, and apply flux and solder to the gaps on either side.
To show the whole process from start to finish, here’s a video that might be easier to follow:
Step Eight: Tin Edges
Now that your front design is completely soldered and your edges are either beaded or have hobby came, it’s time to prepare all your pieces to be soldered together.
To do this you need to tin all the edges of your other pieces of glass – the bottom, and the two triangle sides.
NOTE: I was deep into a podcast and completely forgot this step, so my photos will look different. I will be sure to record when I make another one and replace them LOL
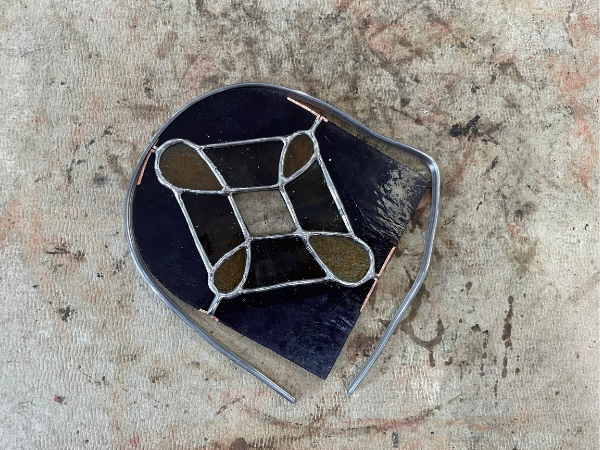
Step Nine: Tack Base to Front Design
To start assembling your candle holder you’ll want to lightly attach, or tack, your front design to the square base.
The front piece and your base should create a V SHAPE at the bottom. To do this you’ll only lay the bottom of your front piece partly over the edge of your square bottom piece.
It should look something like this:
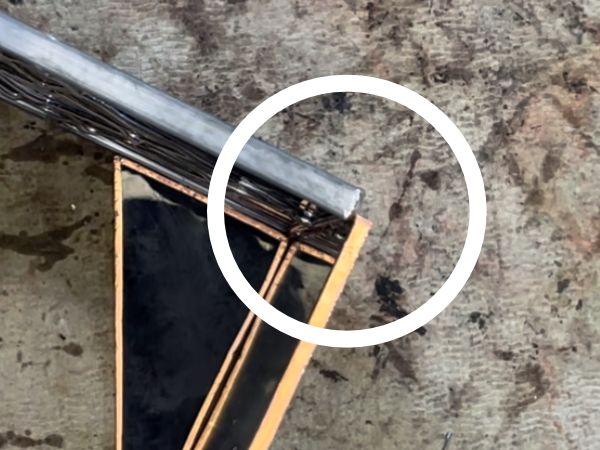
With your glass lined up so that it’s half way sitting on the bottom piece’s edge, hold the front design as straight up as possible and tack two small pieces in the middle. Don’t forget to add your flux before you try to lay the solder down.
At this stage you still want a little wiggle room for the front design, so only a couple of tacks will do. That way you can line it up straight with your side pieces.
Step Ten: Tack Sides to Base and Front Design
Now that your front design is lightly tacked to your base, line up one of your sides so that it is flush with both the base and the front piece. The only V channel you should have is at the bottom of your front piece of glass.
Tack your side triangle piece and then move to the other side and tack that piece.
Step Eleven: Solder Entire Piece Together
Now that your piece is all tacked together and everything is straight, it’s time to apply a nice bead of solder to all inside and outside joints.
Apply your flux and begin to solder. Similar to a stained glass box, the insides of these pieces can be a little difficult to get to. Just move it around until you can get a good angle, and don’t forget you can always use something like an extra roll of solder to prop it up if you need to.

Step Twelve: Bead Up Exposed Edges
Your candle holder is almost complete. All that’s left for soldering is to bead up the exposed edges so you have a nice, clean piece of glass work.
The only exposed edges you should have left are the tops of your side triangles, and the back edge of your bottom.
With your solder situated so that you can grab it with one hand, carefully pick the solder up with your iron and tap it down until the entire edge has a nice bead.

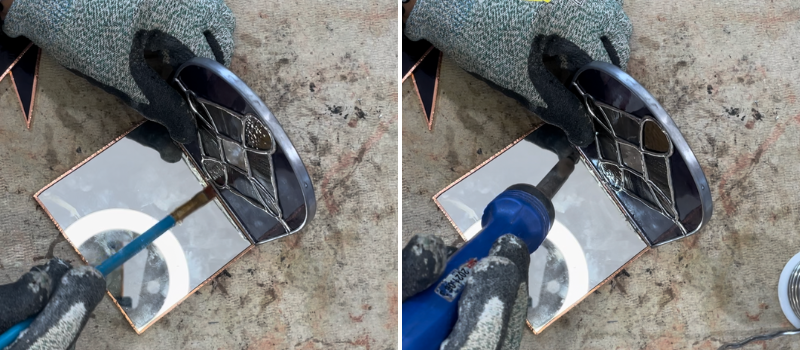
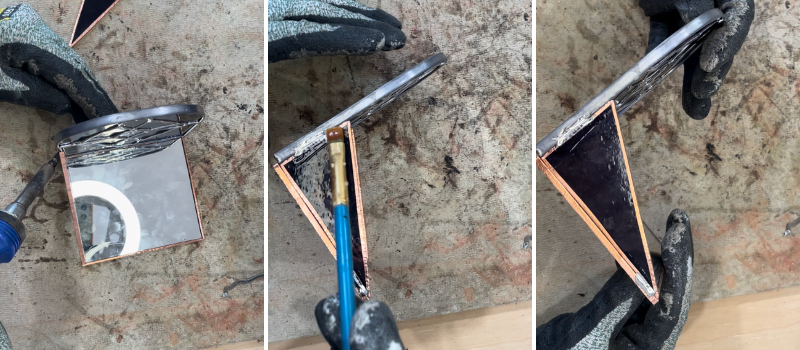
Step Thirteen: Wash & Patina
Now all that is left to do is wash all the flux off your piece, and patina if you wish to change the metal color to copper or black.
I left mine silver. 90% of the time I patina my solder black, but I really liked the silver look on this piece. I can’t wait to see it lit up!
This candle holder is big enough for some standard candles, or you could simply place a tea lite on the base. Either way, it’s going to look amazing!
I hope you enjoyed this DIY stained glass project. Let me know how yours came out! Happy Creating <3


