
For those looking to take their craft to the next level, mastering the use of wire in stained glass can open up so many possibilities. Whether you’re a seasoned artisan, a DIY enthusiast, understanding wirework can significantly enhance your projects.
In this guide, we’ll explore the types of wire to use in stained glass, how wire can be crucial for your work, and practical tips on incorporating wire into your designs. By the end of this post, you’ll have a clear understanding of how to use wire to elevate your stained glass creations.
This page may include affiliate links. If you click and purchase, I may receive a small commission at no extra cost to you. As an Amazon Affiliate I earn from qualifying purchases. You can read my full disclosure here. Thank you for your support <3
Tinned Wire For Stained Glass
Nine times out of ten you are going to want to use a tinned wire, also known as pre-soldered wire. This is because:
- Copper is highly corrosive and tinning it will add a protective layer
- Tinning the wire allows you to patina it to match the rest of your project
If you have some copper wire laying around, you can also simply “tin” your copper wire yourself before using.
Tinned wire comes in various sizes depending on how you want to use it. This is going to be the most important thing to look for. The sizes go by gauges that go up in numbers the smaller the size.
For instance 20 gauge is smaller than 12 gauge.
The smallest tinned wire I’ve ever used on my projects is 20 gauge, and the largest is 14 gauge. Personally, I mostly use 14 gauge tinned wire in my studio.
Why Use Wire in Stained Glass
Wire can transform a simple stained glass project into a masterpiece. Let’s explore why incorporating wire in your stained glass work is a game-changer.
Add Complex Lines in Less Time
Creating detailed lines and patterns with glass alone can be time-consuming and challenging. Wire offers a quicker and more efficient way to add more detail to your designs. By soldering wire directly onto the glass, you can achieve intricate patterns and shapes with less cutting and foiling.
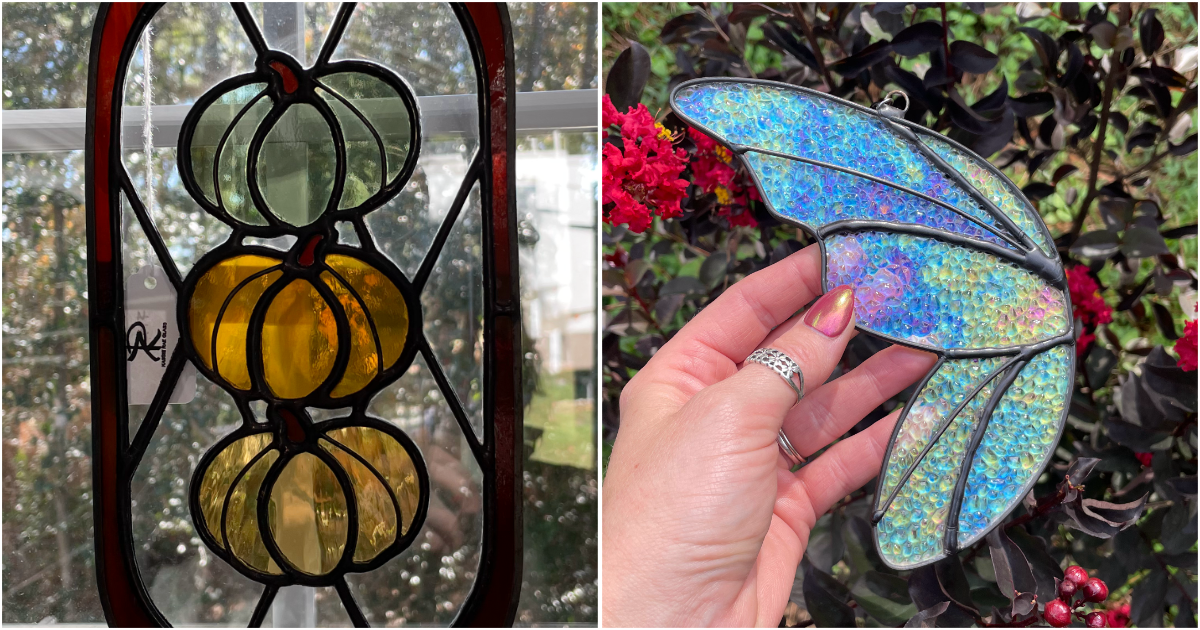
Take this pumpkins stained glass pattern and fairy wing above. The more pieces of glass your project has, the longer it will take. In the pumpkin suncatcher there are 32 pieces of glass if you use the tinned wire to fill in the side pumpkin lines. However if I didn’t do this, there would be 44 pieces of glass in total. That’s 12 more pieces of glass to cut, grind, and foil.
Add Decorative Details
Incorporating wire into your stained glass projects can add a unique and artistic touch. From elegant swirls to intricate filigree, the flexibility of wire allows you to get experimental.
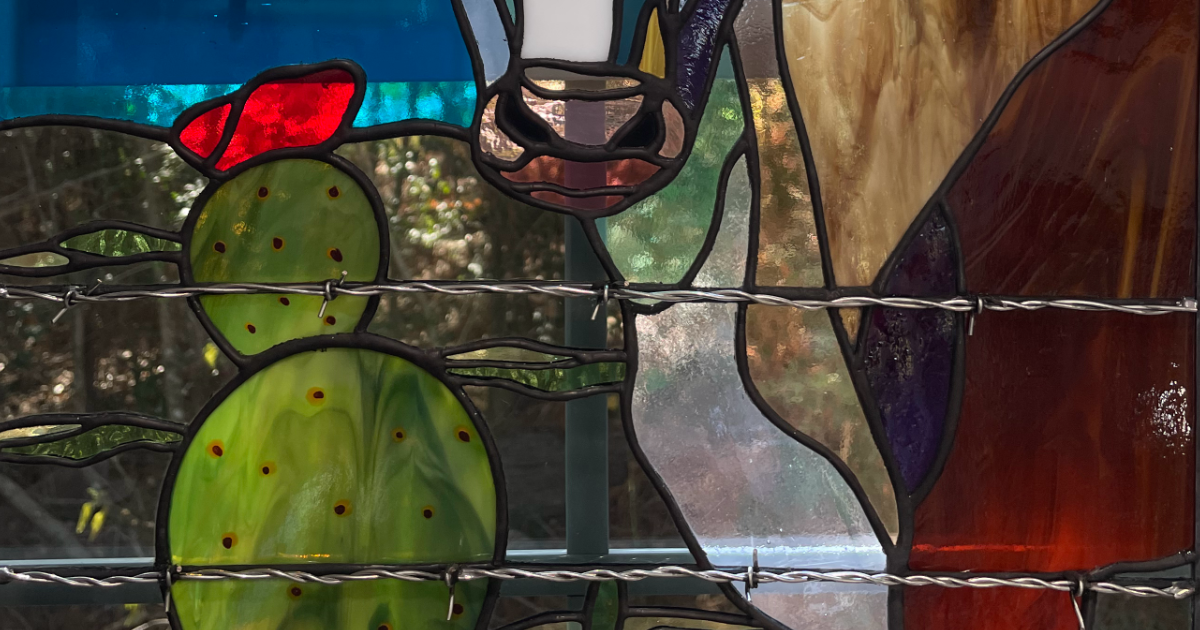
As you can see in the photo above, I used wire to create a barbed wire effect, and soldered that directly to my stained glass piece.
The same technique of overlapping wire on your stained glass images could be used for an infinite amount of ideas. All you have to do is come up with them!
Enhance Strength in Fragile Areas
Certain designs, especially those with intricate patterns, and creative shapes can be prone to breakage. Adding wire to fragile areas can significantly enhance the strength and durability of your stained glass piece.
For example, if you’re creating a free-form piece (meaning its shape is irregular, not square or any other basic shape) you can use wire in areas that may break off over time.
In this instance you would use copper or tinned wire to solder alongside your solder lines and border to create a strong hold.
You can also use tinned wire to solder alongside any part of your stained glass piece to create more strength.
Tips for Using Wire on Stained Glass
To make the most of wire in your stained glass projects, follow these practical tips.
Patina the Wire After Soldering
Patina is a chemical treatment that can change the color of the solder and wire, giving it an aged or antique appearance, and comes in two different colors: copper, or black.
Whichever color patina you choose – if at all (because you can TOTALLY also just leave all your solder silver.) Should be applied after you have soldered all of your wire to your stained glass project.
Apply the patina using a soft brush or cloth, and be sure to follow the manufacturer’s instructions for the best results.
Choose the Right Size Wire
Selecting the appropriate wire size is crucial for achieving the desired effect in your stained glass projects. Thicker wire provides more strength and support, making it ideal for reinforcing large areas. Thinner wire, on the other hand, is better suited for adding decorative elements, and reinforcing smaller more intricate pieces of glass.
When choosing wire, consider the specific requirements of your project. For example, if you’re creating a large panel with heavy glass pieces, opt for a thicker wire to ensure stability. Conversely, if you’re adding fine details to a delicate suncatcher, a thinner wire will give you the precision you need.
Use High-Quality Tools
Investing in high-quality tools can make a significant difference in the ease and outcome of your wirework. A good soldering iron with a fine tip, good solder, and precise wire cutters or lead nippers are essential for achieving clean and professional results.
Using a temperature-controlled soldering iron can help you maintain the right heat level, ensuring a strong bond between the wire and the glass. Additionally, high-quality solder with a lower melting point will make the soldering process smoother and more efficient.
Experiment
Mastering wirework in stained glass takes practice. Don’t be afraid to experiment with different techniques and wire sizes to find what works best for you. Try creating small test pieces to hone your skills and gain confidence in your wirework abilities.
Take the time to learn from mistakes and refine your techniques. With practice, you’ll become a wire-working master!
Conclusion
Incorporating wire into your stained glass projects can elevate your work to new heights. Whether you’re looking to enhance the strength of fragile areas, add complex lines quickly, or introduce decorative details, wire offers a versatile and effective solution.
By choosing the right wire, and following practical tips you can master wirework in stained glass and create stunning, one-of-a-kind pieces. Remember, the key is to experiment, have fun, and push the boundaries of your creativity!


